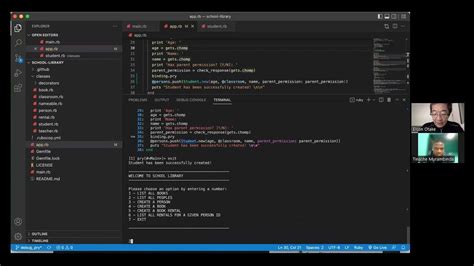
The basic setup of Pry-Byebug is as simple as installing byebug. Add gem 'pry-byebug' to the Gemfile and run bundle install in the console. After successfully installing the gem, use binding. pry command in our lock method.
- Install Code runner extension.
- Cmd + Shift + p.
- choose Run By language.
- type ruby.
immediately before the line you wish to start debugging. Next step: run your unit tests as you would do normaly. At the moment that ruby reaches the line that contain the debugger directive it will stop and show you a console prompt. Now you can debug in the same way as you would do with gdb.
The Ruby programmer can invoke the pry console during runtime by inserting the line 'binding. pry' wherever they would like to stop the program. When the interpreter hits the binding. pry, Pry will open a REPL session in the console, allowing you to test variables, return values, iterations, and more.
Starting ByebugTo get going, simply type byebug (or debugger ) into your source file at the line you're interested in and run the program. If you're running it on a Rails application, remember to switch to your terminal window to look at debugger output.
Installing Ruby Using the RubyInstaller Tool
- Step 1: Download the RubyInstaller Tool.
- Step 2: Run the Ruby Installer.
- Step 3: Verify the Ruby Installation.
- Step 1: Enable the Windows Linux Subsystem (WSL)
- Step 2: Install Linux Distro.
- Step 3: Update the Linux Subsystem.
- Step 4: Install Ruby.
- Step 5: Verify the Installation.
Running a ScriptIt's easy -- just create a file with the extension . rb , navigate to that file's directory from the command line, and run it using $ ruby filename. rb (the dollar sign is just the command prompt). You'll be able to gets from and puts to the command line now!
To start pry, simply type pry after the gem is installed. You can also make it part of your application's dependencies by adding gem "pry" to your application's Gemfile. Installing pry from within the application has its own benefits. In fact, there is a pry-rails gem that replaces the Rails console with Pry.
pry” work? In simple words, when you invoke “pry” on an object, Pry gets the binding of that object and starts a REPL in its context. You can pass any Ruby object to it. If you pass a Binding instance or a top-level binding, it returns it.
You can either put gem 'pry' in your Gemfile and bundle install, or manually type gem install pry into your terminal. After we've installed it, then we'll have to require it in our environment with the line require 'pry' , write binding. pry on the line we want our code to pause in, and then run our code.
Definition of pry (Entry 2 of 3) transitive verb. 1 : to raise, move, or pull apart with a lever : prize. 2 : to extract, detach, or open with difficulty pried the secret out of my sister.
verb (used with object), pried, pry·ing.to move, raise, or open by leverage. to get, separate, or ferret out with difficulty: to pry a secret out of someone; We finally pried them away from the TV.
If you're in regular old Pry you can use exit to go to the next binding. pry or disable-pry to exit Pry entirely. You can't. pry doesn't have any command who let you jump to the next line.
To get started using Pry, simply include the gem 'pry-rails' in your Gemfile, and bundle install ! Now every time you boot your rails console you'll have a Pry shell as opposed to the standard IRB. Simple!
Bitnami Ruby Stack provides a complete, ready-to-run development environment for Ruby on Rails. It also packages the most popular gems for building Rails applications, including Rake, Passenger, and more. Download installers and virtual machines, or run your own ruby server in the cloud.
To display the backtrace for several or all of the threads, use the command thread apply (see thread apply). For example, if you type thread apply all backtrace , GDB will display the backtrace for all the threads; this is handy when you debug a core dump of a multi-threaded program.
The error-message is “what's wrong” - good error messages are helpful and tell you what you should do and bad error-messages sometimes look like something that could summon Cthulhu. Undecipherable hieroglyphics, aka a bad Typescript error message. The stack-trace on the other hand is “where it's wrong.”
Stack trace or backtrace is a sequential representation of the stack of method calls in a program which gets printed when an exception is raised. It is often used to find out the exact location in a program from where the exception was raised.